The Art of Lash Mapping: Creating Bespoke Beauty
As a lash artist, one of the most thrilling aspects of our craft is the art of lash mapping. It's like crafting a bespoke blueprint for each client's lashes, ensuring every extension is strategically placed to enhance their natural beauty. Today, I want to give you a glimpse into this exciting world that combines precision, creativity, and a deep understanding of individual uniqueness.
Imagine having the power to transform someone's look with just a few strategic strokes of a pen. That's the essence of lash mapping – it's an art form that goes beyond mere application. It's about creating a personalised design that complements each client's features, bringing out their best and boosting their confidence.

Lash mapping is truly where science meets art in our profession. It's not just about applying lashes; it's about crafting a look that's tailored to each individual. We consider factors like eye shape, natural lash length, and the client's desired outcome to create a map that guides us in placing each extension perfectly.
The beauty of lash mapping lies in its ability to create stunning, customised looks. Whether your client wants a natural, everyday look or a dramatic, glamorous style for a special occasion, the right lash map can make all the difference. It's this attention to detail and personalisation that sets apart a good lash artist from a great one.
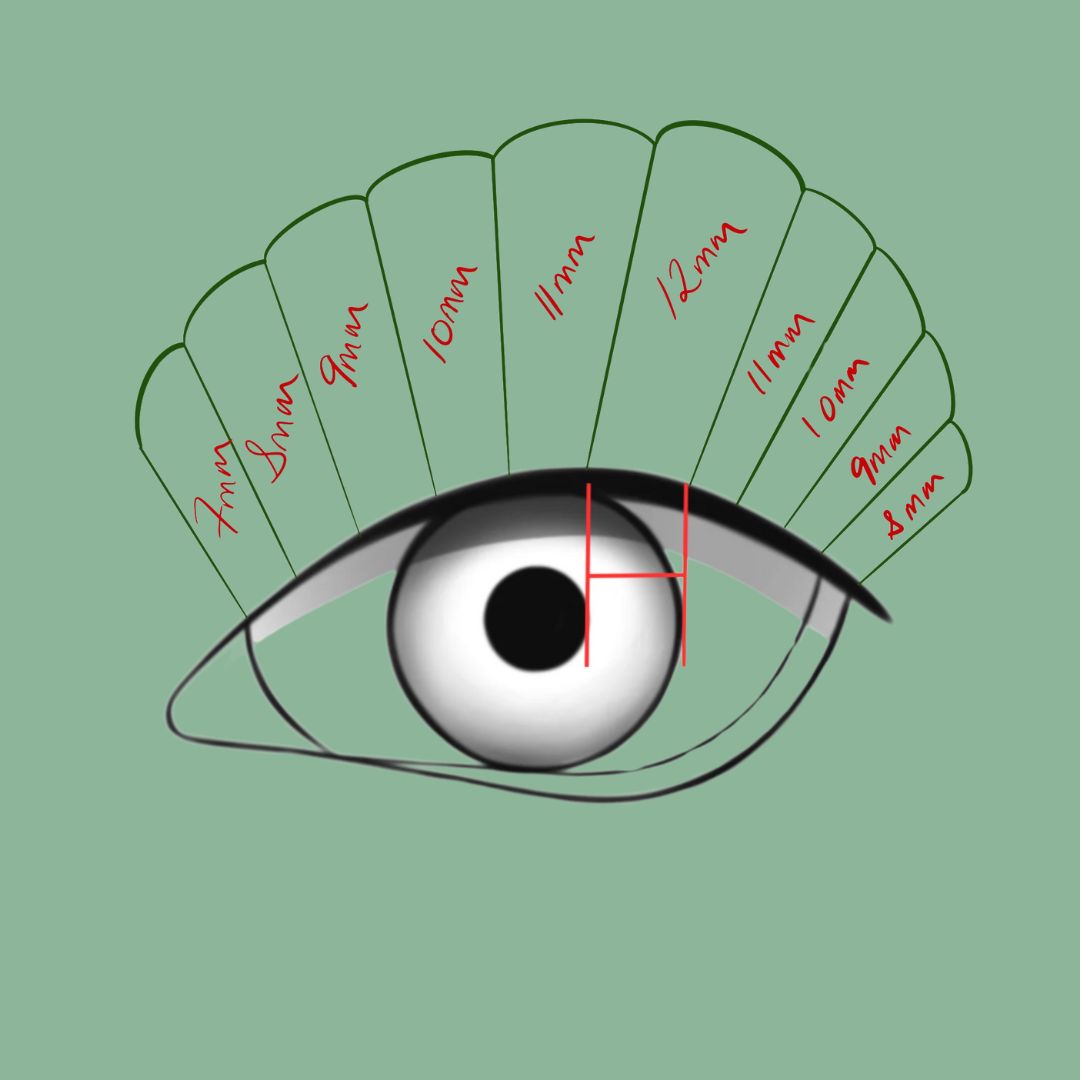
For instance, doll eye lash mapping is a technique designed to create the illusion of larger, rounder eyes. This style involves placing shorter lashes at the inner and outer corners, with longer lashes in the centre of the eye. Typically, you'd start with 8mm lashes at the inner corner, gradually increasing to about 12mm in the middle, then tapering back down towards the outer corner. This mapping suits clients with almond-shaped, hooded, or monolid eyes, as it helps to open up and brighten the face. It's particularly effective for those with smaller eyes or wide-set eyes, as it can make the eyes appear more prominent and closer together.
To create a doll eye map, start by marking the first and last lash on your eyepatch, then make a mark in the middle of the lash line. Next, mark the edges of your longest section, creating a symmetrical arc. The key is to ensure that whatever you do on one side of the map is mirrored on the other, and that both eyes match. This technique requires precision and an understanding of your client's natural lash length and eye shape to achieve the best results. However, it's important to note that this style may not be suitable for clients with very round eyes or eyes set close together, as it could overemphasise these features.
Mastering lash mapping is about more than just creating beautiful lashes – it's about giving your clients a boost of confidence that lasts long after they leave your chair. It's about the joy of seeing their faces light up when they look in the mirror and see their transformed look for the first time.
Overwhelmed by lash info? Sian’s Beginner Course turns chaos into clarity, one easy lesson at a time.

